Bipartite class
The Bipartite is the fundamental class of the BiMat software. This class works as an encapsulator of most of the available classes. Altough it is possible to work with BiMat wihout using the Bipartite class, its use facilitates the access to most of the BiMat features.
The main input of the Bipartite class is a matlab matrix, where the rows will represent the node set $R$ and the columns the node set $C$, such that if the element matrix(i,j)>0 a link between node $R_i$ and $C_j$ exist. This matrix input can contain only non-negative integers $\{0,1,2,3...\}$. However, the user need to know that values bigger than 1 are only used during plotting (i.e. color interactions according to weight) and not in the existing algorithms (which only work in the boolean version of the matrix).
Contents
Optional input
Bipartite class has two different types of optional input. The first type is for node labeling and the main use of it will be for labeling row and column nodes during plotting. The input must be encoded in a cell of strings for each set $R$ and $C$ of nodes, such that each string in a cell corresponds to the label of a node. The size of such cells must correspond to the number of nodes.
The second type of output consist of the classes of node for either row and column nodes. For an example of node class consider a bipartite network where $R$ and $C$ represent pollinators and plants respectivally. In turn pollinators can be classified in birds and insects, which will be the classes for set $R$. The information of this classification is useful to explain modularity in terms of node classes. You can consult the Multi-scale statistics for extended description. The classification input must be vectors of the same size than the number of nodes in rows and columns. The values must be positive integers $\{1,2,3,...\}$.
Bipartite object creation
There exist many ways of creating a Bipartite object. Either the user can create it from scratch using Matlab matrices and cell arrays, or it can be created from text files.
Creating it from scratch
Here, we will show an example of the simplest way of creating a Bipartite object:
%Creating the adjacency matrix
matrix = [2 0 2 2;...
          1 2 2 1;...
          2 0 0 2;...
          0 1 2 2;...
          0 0 1 0];
% For the next variables observe that the size of matrix 5x4 correlates with
% them
%creating row and column labels
row_labels = {'insect 1', 'insect 2', 'insect 3', 'bird 1', 'bird 2'};
col_labels = {'flower 1', 'flower 2', 'grass 1', 'gras 2'};
%class row ids (1 correspond to insect, 3 to bird specie).
row_ids = [1 1 1 3 3];
%class column ids (1 to flower, 5 to grass specie)
col_ids = [1 1 5 5];
Using the data we just created we can now create our Bipartite object:
bp = Bipartite(matrix);
bp.row_labels = row_labels;
bp.col_labels = col_labels;
bp.row_class = row_ids;
bp.col_class = col_ids;
%Peform a simple plot of the network
figure(1);
set(gcf,'position',[360   138   929   592]);
bp.plotter.use_labels = true; %default is to plot labels
bp.plotter.font_size = 16;
subplot(1,2,1);
bp.plotter.PlotMatrix;
subplot(1,2,2);
bp.plotter.link_width = 2.0;
bp.plotter.PlotGraph;
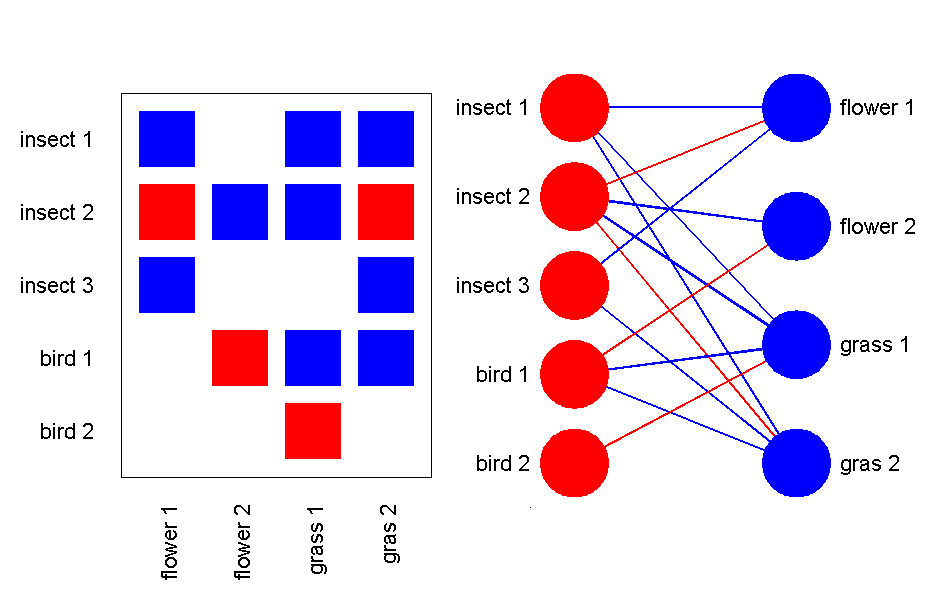
The colors in the matrix cells and graph links correspond to the different values in the adjacency matrix input. As already mentioned, these values are only used for plotting, not for calculating modularity or nestedness (in which the boolean version of the matrix is used).
Creating Bipartite objects from text files
An additional way of creating a Bipartite object is by using the static functions from the Reader.m class. Currently two different formats are available. The first input format will contain only the information of the adjacency matrix (you will need to add row/column labels and ids if you need it). A file example for creating the last data will be:
2 0 2 2
1 2 2 1
2 0 0 2
0 1 2 2
0 0 1 0
The last format input can be called using:
bp = Reader.READ_BIPARTITE_MATRIX('data/input_matrix.txt');
% We need to add labels and class ids by ourselves
bp.row_labels = row_labels;
bp.col_labels = col_labels;
bp.row_class = row_ids;
bp.col_class = col_ids;
The second input format consists on writing the adjacency list. This input format will read also the row and column node labels. The user still need to add the class ids if he needs it. An example of this kind of input text fill will look like:
insect_1 2 flower_1
insect_1 2 grass_1
insect_1 2 grass_2
insect_2 1 flower_1
insect_2 2 flower_2
insect_2 2 grass_1
insect_2 1 grass_2
insect_3 2 flower_1
insect_3 2 grass_2
bird_1 1 flower_2
bird_1 2 grass_1
bird_1 2 grass_2
bird_2 1 grass_1
The middle column is optional. If it is not used, the reading function will assume that it is composed of ones only. We can now just call:
bp = Reader.READ_ADJACENCY_LIST('data/input_adja.txt.');
% Wee need to add class ids by ourselves
bp.row_class = row_ids;
bp.col_class = col_ids;